Saturday, January 29, 2011

Papercraft 6 - Yukata

As an anime fan i wanted to do a papercraft that reflects both my anime likes and a japanese style, so after not much search on the web I found this wonderful papercraft. It is a very detailed and hard-to-do papercraft, as it involves a great level of detail (specially on the hands as you shall see) and lots of patience. This model took about 3 days to complete, so believe me, it is hard !

The 2 most difficult parts to assemble on this papercraft were:
  • Hands - This ones have a GREAT level of detail, since it includes individual pieces for the hand and fingers.
  • Kimono - This might seem easy at the naked eye, but it does involves several interesting folds that give the whole figure its own flavor. Assembling the kimono must be done in order to avoid having parts difficult to paste.
Word of advise: Assemble the top half section first (from the waist up) and the bottom half afterwards (from the waist down). Both parts can be fixed without glue (just inserted one into the other) with enough patience.

When you print the patterns, the lower section of the kimono (the one that resembles a skirt) is white on the interior. I decided to paint it black with a permanent marker to give the sensation that the whole kimono fabric is black. It does not looks that bad if you leave it in white, but looks great in black.

Here the long awaited pics.


Here the detail on the hands. Each finger is a separate piece, so it takes time and patience to assemble it !


The model DOES NOT includes instructions, but the advantage is that it is in PDO file, so you can use the 3d model to guide your assembly. Remember that PDO files are open with the Pepakura Viewer (see links on the right).

The Yukata papercraft was made by a famous papercraft designer Moekami. Unfortunatelly the model is no longer available on it's original site, but...

This beautiful papercraft can be downloaded HERE.

Enjoy !

Papercraft 5 - Welsh Corgi Pembroke

This is one of the most simple and beautiful papercrafts I have done. This is for a very special dog species: the Welsh Corgi Pembroke. You might remember this dog as it is the Queen Elizabeth's favorite dog AND it is one of the most iconic characters from the COWBOY BEEBOP anime series: Ein !

Here is it !


This model was printed on an Inkjet printer, therefore the small lines are visible.
This model is from the Canon Creative Park, and can be downloaded HERE.

Enjoy !

Papercraft 4 - Terran Command Center


Being a Starcraft fan myself, I decided to search for some papercrafts from this great game. Fortunatelly I found THIS PLACE where you can download a whole bunch of papercrafts from a lot of units.
Here I did the Terran Command Center. The model is actually pretty good and very well detailed. Has lots of big pieces so it is kinda easy to assemble.
The main challenge of this papercraft is to assemble all the pieces together. This model is done by assembling first mostly all of the pieces individually and then assembling the model all together at the end. This might prove a very good challenge, as when the final assembly is being done, most of the pieces tend not to be on the site they should be.

Word of advise: Do assemble all the parts individually and then use the big flat base as a guide to paste all the pieces together, one by one and starting from the center outwards. This helps a lot since the model is circular.

Perhaps the most difficult parts to assemble are the brown parts on the side of the Command Center, as they are very fragile both to assemble and to paste to the final model. Also, the entrance ramp might prove a small challenge to paste it to the final model.

One of the MAIN drawbacks I found when assemblying this model was that there was just 1 photo of the papercraft available (at least on spanish/english sites, since the original model is Korean). Here is the photo.

Here I give you a lot of pics from lots of angles to help on the assembly.


Very nice detail: The inside of the command center !


This is the bottom part of the command center once assembled. Be very careful to move the model around as it is a bit fagile !


I have no direct download for the Command Center alone, but if you are a Starcraft fan, you would not mind download the whole papercraft kit HERE.

Enjoy !

Papercraft 3 - Bulldozer


Today I bring you THE BULLDOZER !!

This is an amazingly detailed papercraft from the Canon Creative Park. It is pretty big and does has a lot of pieces to assemble. This one might prove a very good challenge for the beginner, as it has some big pieces and some small ones.

One thing I liked a lot of this model is that both the front and rear parts of the bulldozer are moveable. Since the assembly permits a small degree of movement, it looks pretty cool !

As you will notice on the photos, I did a small carton base for it, but instead of pasting it from the wheels to the base, I setup a 4 small paper hinges to have the model put on the base. This are inserted into 2 small openings that are already on the model and then pasted to the base. This way the model does not moves from its fixed position.


Here is a close up of the paper hinges used to fix the model to the base. The hinges are pasted to the base and just inserted into the model. They are NOT pasted to the model.


And this model can be downloaded HERE.

Enjoy !

Monday, January 03, 2011

Papercraft 2.1 - Tron LightCycle

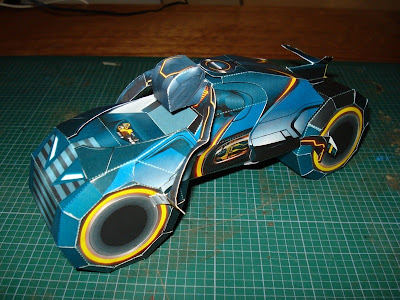
And now, another TRON post, but this time it is from the new movie TRON LEGACY. This is CLU's LightCycle. It is a kinda big model but relatively easy to assemble. The original template comes from the Disney site itself, so it does is pretty original LOL.

Not to much to say, personally I did not liked it very much, but the final results are satisfactory. Here the model:


And this model can be downloaded HERE.

Caution word: This model is in PDF format, however i had some troubles when printing the 2nd and 3rd pages, as it seem to be too big for the printer to handle. I made a conversion of the whole template in JPG format and printed it afterwards, worked like a charm !

Papercraft 2 - Tron

You might remember one of the best Sci-Fi movies ever made by Disney. It was about a guy that was able to get into the computer world (literally) and have a great adventure inside circuits and programs. I'm talking about TRON. This past December 25th, Disney made a new movie about this adventure: TRON LEGACY.

This post will contain a nice papercraft from the Classic Recognizer from the original Tron movie. It is very simple to assemble, as most of its parts are squares and some triangles. This is a very good paperkraft to beginners. However, the model parts do not "assemble" one with each other, as the original Recognizer was kinda floating without any kind of junction (this was of course within the Tron realm ^_^) sooo, getting the whole model together requires an assembly template, where you can paste the model to and let it hang maybe on your wall or make a small diorama, as it is presented here.

On this variant, I decided to paste the model pieces to a transparent acetate paper, by putting the assembly template behind the acetate and pasting the pieces to it. It is possible to leave the model in this fashion and you can hang it on your wall. This will make a very good illusion that it is pasted directly to the wall, when in reality it is not.

Yet, I wished to give some mood to the model, so I got a small card box, printed some patterns to paste on the inside of the box and finally put the model with the acetate inside. Here the final result:


The model can be downloaded HERE. It includes both the model an an alternate ambience made for it.
And, here the patterns for the FLOOR, WALL1, WALL2, and BACKGROUND.

Final note: I did this model in LETTER size, the original size is in A4, so this model is a bit smaller. Also, I noticed that the original templates DO NOT HAVE pasting flaps, so you need to make some on your own, be careful with this !!